Pythonのパッケージ管理ツールは一般的に『pip』が使われることが多いだろう。
pip freeze でインストールされたパッケージの情報を出力し、requirements.txt にて管理する。
パッケージを管理するにあたって特に不自由はしないが、個人的にはこれから紹介する『poetry』がオススメ。
パッケージ管理ファイルの生成や仮想環境の作成等を担ってくれるのだ。
この記事では、Pythonのパッケージ管理ツールの一つである poetry の導入手順を簡潔に解説していくので、是非参考にしていただきたい。
-

-
Pythonのisortインストール手順。VSCodeで保存するときにimport文を自動整列させる
Pythonでプログラムを実装する際に、モジュールを使用するにあたって最初にimport文を書く。 実は、このimport文にはPEP8に基づいて、正しい順序が定められているのはご存じだろうか? あま ...
続きを見る
Poetryとは
公式のドキュメントから一部抜粋すると、
Pythonでの依存関係管理とパッケージングのためのツールです。 Poetryを使うとプロジェクトが依存しているライブラリを宣言でき、それらを管理 (インストールおよびアップデート) してくれます。
Poetry documentation (ver. 1.1.6 日本語訳) - 入門
ポイントとしては、
ポイント
pyproject.tomlおよびpoetry.lockファイルを生成し、パッケージを管理する。- パッケージのインストールやアンインストールに合わせて生成されたファイルも更新され、管理が容易となる。
- バージョン追加時等に依存関係も管理できる。
- 生成されたファイルをGit管理下にしておくことで、プロジェクト管理も容易となる。
- 仮想環境の作成もできるので、プロジェクトや環境ごとの使い分けができる。
など、Pythonの開発環境を汚さずに、パッケージ管理ができるようになる点が魅力的だ。
インストール
Linux/macOS
以下のcurlコマンドを入力して、poetryをインストールする。
curl -sSL https://install.python-poetry.org | python -末尾の"python -"はバージョンによって"python3 -"とする必要があります。
以下のget-poetry.pyまたはinstall-poetry.pyを指定したコマンドの場合、エラーとなることがあります。
バージョンアップに伴い、旧コマンドが非推奨となったため、最初に紹介したコマンドを使用しましょう。
curl -sSL https://raw.githubusercontent.com/python-poetry/poetry/master/get-poetry.py | python -curl -sSL https://raw.githubusercontent.com/python-poetry/poetry/master/install-poetry.py | python -Version 1.2.0 does not support this installation method. Please specify a version prior to 1.2.0a1 explicitly using the '--version' option.
Please see https://python-poetry.org/blog/announcing-poetry-1-2-0a1.html#deprecation-of-the-get-poetry-py-script for more information.
/bin/sh: 1: poetry: not found
1 error occurred:公式推奨のcurlを使用したインストール方法。
pip installでもインストール可能だが、poetryと他のパッケージの依存関係が衝突するなどの支障が懸念されるとのこと。
インストールが正常に完了すると色々と出力されるが、PATHを通すようにといった内容が書かれている。
基本的には自動でPATHが通る。
% curl -sSL https://install.python-poetry.org | python -
Retrieving Poetry metadata

This installer is deprecated. Poetry versions installed using this script will not be able to use 'self update' command to upgrade to 1.2.0a1 or later.
# Welcome to Poetry!

This will download and install the latest version of Poetry,
a dependency and package manager for Python.

It will add the `poetry` command to Poetry's bin directory, located at:

%USERPROFILE%\.poetry\bin

This path will then be added to your `PATH` environment variable by
modifying the `HKEY_CURRENT_USER/Environment/PATH` registry key.

You can uninstall at any time by executing this script with the --uninstall option,
and these changes will be reverted.

Installing version: 1.1.12
  - Downloading poetry-1.1.12-win32.tar.gz (51.60MB)

Poetry (1.1.12) is installed now. Great!

To get started you need Poetry's bin directory (%USERPROFILE%\.poetry\bin) in your `PATH`
environment variable. Future applications will automatically have the
correct environment, but you may need to restart your current shell.
Windows
Windowsの場合はこちら。
(Invoke-WebRequest -Uri https://raw.githubusercontent.com/python-poetry/poetry/master/install-poetry.py -UseBasicParsing).Content | pythonInvoke-WebRequestで以下のようなエラーが出る場合は、次のコマンドで改善されることを確認したので試していただきたい。
Invoke-WebRequest : 要求は中止されました: SSL/TLS のセキュリティで保護されているチャネルを作成できませんでした[Net.ServicePointManager]::SecurityProtocol = [Net.SecurityProtocolType]::Tls12インストール確認
インストール後は一度シェルやVSCodeを再起動してください。設定が反映されていない場合があります。
バージョン確認
poetry --versionコマンドにて、正常にインストールされていることを確認しよう。
インストールしたバージョンが表示される。
poetry --versionエラーとなる場合はPATHを設定する
Windows
Windowsで以下のようなエラーが出る場合は、PATHが通っていない可能性がある。
poetry : 用語 'poetry' は、コマンドレット、関数、スクリプト ファイル、または操作可能なプログラムの名前として認識されません。名前が正しく記述されていることを確認し、パスが含まれている場合はそのパスが正しいことを確認
してから、再試行してください。
発生場所 行:1 文字:1
+ poetry --version
+ ~~~~~~
    + CategoryInfo          : ObjectNotFound: (poetry:String) [], CommandNotFoundException
    + FullyQualifiedErrorId : CommandNotFoundException
PATHの通し方について、
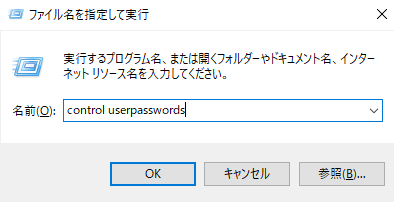
[Windowsキー] + [R] にて「ファイル名を指定して実行」を開き、control userpasswordsを入力して [OK] を選択する。
すると、コントロールパネルの「ユーザーアカウント」の画面が開くので、「環境変数の変更」をクリックする。
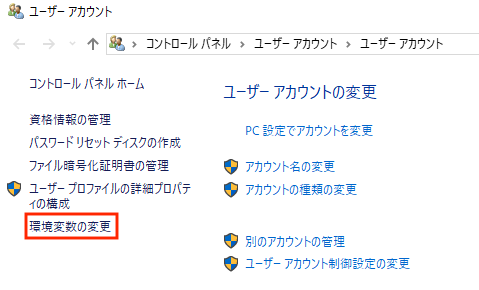
「環境変数」の画面が開くので、Pathに C:\Users\hoge\.poetry\bin があることを確認しよう。
パスがない場合は新規ボタンから追加する。
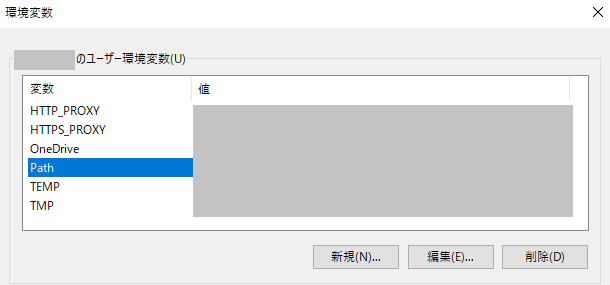
環境変数設定後は、シェルやVSCodeを再起動して再度コマンドを確認する。
Linux/macOS
Linuxの場合は~/.bashrc、macOSの場合は~/.zshrcなど使用しているシェルの種類に応じてPATHを確認していただきたい。
以下がない場合は追記をする。
export PATH="$HOME/.poetry/bin:$PATH"初期設定
プロジェクト配下で、以下のコマンドを使用して初期設定を行う。
poetry initpoetry newコマンドによる初期化は、プロジェクトが作成されていない(ディレクトリが作成されていない)際に使用するため、必要に応じて使い分けていただきたい。
実行後、対話形式で必要情報の入力を促されて、パッケージ管理に使用する pyproject.toml が作成される。
% poetry init
This command will guide you through creating your pyproject.toml config.

Package name [fuga]:
Version [0.1.0]:
Description []:
Author [None, n to skip]:  hoge
License []:
Compatible Python versions [^3.9]:

Would you like to define your main dependencies interactively? (yes/no) [yes] no
Would you like to define your development dependencies interactively? (yes/no) [yes] no
Generated file

[tool.poetry]
name = "fuga"
version = "0.1.0"
description = ""
authors = ["hoge"]

[tool.poetry.dependencies]
python = "^3.9"

[tool.poetry.dev-dependencies]

[build-system]
requires = ["poetry-core>=1.0.0"]
build-backend = "poetry.core.masonry.api"

Do you confirm generation? (yes/no) [yes] yes
仮想環境の作成
事前設定
プロジェクト配下に仮想環境を作成するために、以下のコマンドで作成前に設定を変更する必要がある。
poetry config virtualenvs.in-project true以下のコマンドで設定が変更されたことを確認。
poetry config --list% poetry config --list
cache-dir = "C:\\Users\\xxxxx\\AppData\\Local\\pypoetry\\Cache"
experimental.new-installer = true
installer.parallel = true
virtualenvs.create = true
virtualenvs.in-project = true
virtualenvs.path = "{cache-dir}\\virtualenvs" # C:\Users\xxxxx\AppData\Local\pypoetry\Cache\virtualenvs明示的に仮想環境を作成
明示的に仮想環境を作成するためには、以下のコマンドを実行する。
poetry env use python% poetry env use python
Creating virtualenv python in C:\Users\username\dev-project-name\.venv
Using virtualenv: C:\Users\username\dev-project-name\.venvプロジェクト配下に.venvディレクトリが作成されていることが確認できるはずだ。
また、以下の2つのコマンドにて仮想環境の情報を確認することが可能。
poetry env listpoetry env info% poetry env info
Virtualenv
Python: 3.9.7
Implementation: CPython
Path: /Users/username/dev-project-name/.venv
Valid: True
System
Platform: darwin
OS: posix
Python: /Users/username/.pyenv/versions/3.9.7また、仮想環境はpoetry shellにて入ることができ、deactivate/exitとすると仮想環境から出ることができる。
シェル起動時に有効化
VSCodeなどでターミナル(シェル)を起動した際に、毎回poetry shellをして仮想環境を有効化するのが面倒な人向け。
Linuxの場合は~/.bashrc、macOSの場合は~/.zshrcなど、使用しているシェルの種類に以下を追記する。
source ./.venv/bin/activateパスは適宜変更してください。プロジェクトディレクトリ配下にある .venv を指定します。
コマンド一覧
以下のコマンドにて、使用方法やオプションの一覧が表示されるので、合わせてご覧いただきたい。
poetry --helpよく使用するコマンドを紹介する。
poetry.lock を参考にパッケージをインストールする。
poetry installpyproject.tmol を参考にパッケージの依存関係のチェックとインストールを行い、poetry.lock を更新。
手動で pyproject.toml に変更を加えた際に実行が必要だ。
poetry updateパッケージを追加する際に実行する。
pip installと同等でpoetry add {パッケージ名}のように使用。
poetry addパッケージを削除。
poetry removeインストール済みのパッケージ一覧を表示。
poetry showまとめ
以上、概要から始まり、インストール手順と仮想環境の作成、基本的なコマンド等を解説した。
個人的にはpipよりも使いやすく、pyenvと合わせて組み合わせて開発環境を構築することが多い。
-
-
pyenvでPythonのバージョンを複数使い分けて管理!poetryとの組み合わせがオススメ
Pythonには2系から3系のように幅広くバージョンがある。 プロジェクトごとにパージョンが異なったり、特定のバージョンでしか動作しないプログラムなど、バージョンを使い分けたい機会は多い。 そこで便利 ...
続きを見る
この記事が少しでも参考になると幸いだ。
最後まで目を通していただき、ありがとうございました。